Sizing Info.
Piping Technology & Products’ constant support hangers are principally used to support pipes and equipment subjected to vertical movement due to thermal expansion at locations where the transfer of stress to other supports or equipment can be critical.

The constant resistance to a load is achieved by combining a spring coil with a cam which rotates about a main pivot point. The cam is designed such that the distances from the main pivot changes to compensate for the variable resistance during compression of the coil. The MSS standard provides for a tolerance of 6% in the constant load through the travel range. Our constant support hangers are designed per MSS, ANSI, and ASME standards. maximum recommended variation according to MSS standard from the operating load is 25% for variable spring hangers. If the variation exceeds 25%, a constant support hanger should be used.
Caution: Do not force the travel stops.
PT&Ps’ constant support hangers are principally used to support pipes and equipment subjected to vertical movement due to thermal expansion at locations where the transfer of stress to other supports or equipment can be critical. The maximum recommended variation according to MSS standard from the operating load is 25% for variable spring hangers. If the variation exceeds 25%, a constant support hanger should be used. The constant resistance to a load is achieved by combining a spring coil with a cam which rotates about a main pivot point. The cam is designed such that the distances from the main pivot changes to compensate for the variable resistance during compression of the coil. The MSS standard provides for a tolerance of 6% in the constant load through the travel range. Our constant support hangers are designed per MSS, ANSI, and ASME standards.
PIPE STRESS ANALYSIS
Spring Supports sizing is determined by a Pipe Stress Model which assesses the thermal growth and associated stress on the piping, nozzles, etc. The Pipe Stress model determines how the piping can be designed to move and avoid placing under stress on the nozzles to equipment and the piping itself. Having started as a Pipe Stress Engineering company, PT&P has deep experience in Pipe Stress Analysis. We can quote directly from the stress analysis. Beyond the Pipe Stress analysis, we will need elevation, attachment type, and any space constraints. Another issue that comes up from many customers is the need to replace spring supports for which the load information has been lost. For these situations, PT&P has the following solutions:
– Estimate the load based on the pipe and media specification and estimate movement from existing spring support
– Weigh the Piping to determine the load and estimate movement from existing spring support
– Perform a Pipe Stress Analysis to determine exact load and movement. To perform a Pipe Stress Analysis, PT&P will need Isometrics and overall specifications for the line. PT&P is almost always very cost-effective for Pipe Stress Analysis.* If drawings are unattainable or you don’t have access to the ISO drawings, we can perform Laser Scanning on the piping system and generate the drawings.
SIZING CONSTANT SPRING SUPPORTS
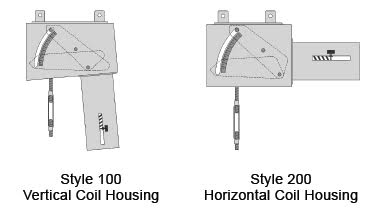
Both constant support styles, style 100 (with a vertical coil housing orientation), style 200 (with a horizontal coil housing orientation), function in the same manner. The key to selecting a constant support style would be the space available for that support above, below and around the piping (see below).
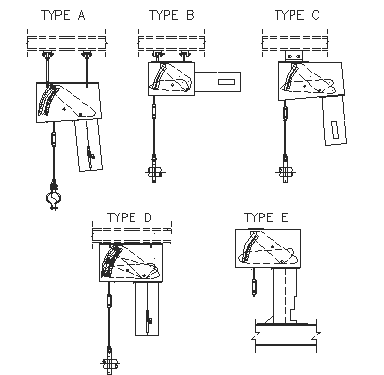
The next step would be to select a support type. Types that support piping from above would be types (A, B, C, D, E, and G), as in the above examples. Types that support piping from below would be types (F and U).
Step 1: Determine The Load: this is the load (installed/operating) of the equipment or piping (including tare / dead weight), which the constant is to support. Cold and hot loads shall be the same.
Step 2: Determine Total Travel: the total travel is the vertical design travel plus the recommended over travel rounded up to the nearest ½ inch. The over travel is a safety margin to allow for the discrepancy between the calculated and actual travel.
The amount of over travel is determined by the method outlined below:
a) For actual travel less than 5 inches, the over travel is 1 inch.
b) For actual travel of 5 inches and over, the over travel is 20% of the actual travel.
Total Travel = Actual Travel + Over Travel
Step 3: Review Load and Travel Table
Step 4: Determine the Type
SIZING CONSTANTS (Examples)
Having the total travel and load, the constants are sized per the constant load table. For a given total travel on the top row of the constant load table, select the operating load on the high side under the column. Then move across to the first column to determine the size of the constant support. The following examples will illustrate the procedure.
Example 1 Load = 2,400 lb. Actual Travel = 3.35”
Given an actual travel of 3.35”, which is under 5”, the amount of over travel is 1”. Thus, the total travel is 4 1/2” rounded to the upper 1/2”. For a total travel of 4 1/2” on the top row of the constant load table with a load of 2,456 lb. on the high side (the other load of 2,361 lb. is the low side) gives a constant size of 34 in the first column.
Example 2 Load = 2,400 lb. Actual Travel = 7.10”
Given an actual travel of 7.10”, which is over 5”, the amount of over travel is 1.42”. Thus, the total travel is 9” rounded to the upper 1/2”. For a total travel of 9” on the top row of the constant load table with a load of 2,413 lb. on the high side (the other load of 2,277 lb. is the low side) gives a constant size of 44 in the first column.
PHYSICAL DIMENSIONS OF CONSTANTS
The dimensions for the standard PT&P constants are listed in the following pages per load and travel. The sizing of a constant is independent and not related to its dimensions. To get the proper dimensions, figure (100 or 200), type (A, B, C, D, E, F, G, U), load, total travel, and direction of travel are required. The following example will illustrate the procedure.
Example Figure = 200 Type = C Load = 2,356 lb. Total Travel = 5 1/2” UP
From the Figure 200 Type-C list of tables (see Page 81), the J-Rod and Lug Selection table for a load of 2,356 lb. is 3/4”. From this table under the same column the lug information is provided. For a total travel of 5 1/2 the table titled Total Travel 4 1/2 to 6 (see Page 82) will be used to get the physical dimensions. With a J-Rod of 3/4” and a load of 2,356 lb. which falls in the load range of 766 – 2402, the Rod Take Out (RTO) for up travel is 21 11/16 (15 11/16 + 6, for up travel according to the note at the bottom of the table) and all other physical dimensions are given in the same row.
ALL DIMENSIONS ARE IN INCHES UNLESS OTHERWISE NOTED
• RTO – Rod take out for down travel
• F – Maximum length for the load range
• D – J Rod position for down travel
• M – Maximum height for the load range
• E – J Rod position for up travel
• WT – Maximum weight for the load range
| J-Rod and Lug Selection | ||||||||||||
| Load (lbs) | 0 | 766 | 1492 | 2403 | 3869 | 5664 | 9122 | 13355 | 17776 | 23660 | 28628 | 38104 |
| 765 | 1491 | 2402 | 3868 | 5663 | 9121 | 13354 | 17775 | 23659 | 28627 | 38103 | 46104 | |
| J-ROD | 1/2 | 5/8 | 3/4 | 1 | 1 1/4 | 1 1/2 | 1 3/4 | 2 | 2 1/4 | 2 1/2 | 2 3/4 | 3 |
| K-HOLE | 11/16 | 13/16 | 15/16 | 1 1/4 | 1 1/2 | 1 3/4 | 2 | 2 3/8 | 2 5/8 | 2 7/8 | 3 1/8 | 3 3/8 |
| H | 1 1/2 | 1 1/2 | 1 1/2 | 2 | 3 | 3 | 3 | 4 | 4 1/2 | 4 1/2 | 4 1/2 | 5 |
| R | 1 1/4 | 1 1/4 | 1 1/4 | 1 1/2 | 2 | 2 1/2 | 2 1/2 | 3 | 3 | 4 | 4 | 4 |
| S | 7/8 | 11/16 | 1 1/4 | 1 5/8 | 2 | 2 3/8 | 2 5/8 | 2 7/8 | 3 1/8 | 3 3/8 | 3 5/8 | 3 7/8 |
| T | 1/4 | 1/4 | 3/8 | 1/2 | 5/8 | 3/4 | 3/4 | 3/4 | 3/4 | 1 | 1 | 1 |
| W | 2 1/2 | 2 1/2 | 2 1/2 | 3 | 4 | 5 | 5 | 6 | 6 | 8 | 8 | 8 |
| Total Travel 4 1/2 to 6 Inches | |||||||||||||
| Load Range (lbs) | J-ROD | RTO* | A | B | C | D | E | F | G | I | L | M | WT (lbs) |
| 34 -183 | 1/2 | 15 9/16 | 15 1/4 | 10 1/4 | 6 5/8 | 4 3/8 | 2 | 12 | 2 | 11 1/4 | 7 | 4 3/16 | 65 |
| 184 -765 | 1/2 | 16 1/16 | 16 3/4 | 11 3/4 | 8 5/8 | 5 1/8 | 2 3/4 | 15 | 2 3/4 | 11 1/4 | 11 1/2 | 3 11/16 | 105 |
| 766 - 2402 | 5/8 | 15 11/16 | 16 1/2 | 11 3/8 | 8 5/8 | 4 3/8 | 2 | 22 | 2 | 12 1/2 | 11 1/2 | 3 5/16 | 220 |
| 3/4 | 15 11/16 | ||||||||||||
| 2403 - 5663 | 1 | 20 3/8 | 18 | 13 1/4 | 8 5/8 | 5 7/8 | 3 1/2 | 33 | 3 1/4 | 11 1/2 | 11 1/2 | 3 1/2 | 350 |
| 1 1/4 | 22 3/8 | ||||||||||||
| 5664 - 12140 | 1 1/2 | 24 11/16 | 21 3/4 | 16 7/8 | 12 3/4 | 7 3/8 | 5 | 42 | 3 3/4 | 14 1/4 | 13 | 4 1/2 | 975 |
| 1 3/4 | 26 3/16 | ||||||||||||
| 12141 - 23659 | 1 3/4 | 29 | 26 | 20 5/8 | 12 3/4 | 10 5/16 | 7 15/16 | 58 | 6 5/8 | 12 3/4 | 13 | 7 5/16 | 1550 |
| 2 | 34 | ||||||||||||
| 2 1/4 | 36 1/2 | ||||||||||||
| *Rod Take Out (RTO) is for down travel [ Add 6 inches for up travel ] | |||||||||||||
|---|---|---|---|---|---|---|---|---|---|---|---|---|---|
LOAD ADJUSTMENT
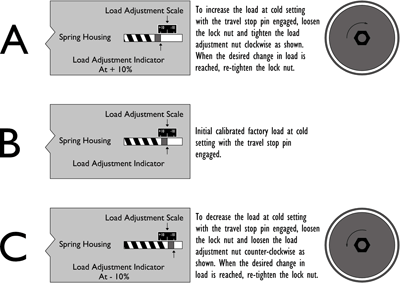
Every constant spring hanger is calibrated in the factory and set to the load specified on the name plate (Figure B). Load adjustment in the field is discouraged as it may significantly change the system.
However, to provide for situations where the supported load is different from the calculated load, the constant spring hangers are equipped with load adjustment capability. The load adjustment capability consists of a load adjustment scale which is used to increase (Figure A) or decrease (Figure C) the load up to 10%. The travel stop pin must be engaged before load adjustment is performed. Adjusting the load to a higher or lower load from the load specified on the nameplate using field load adjustment is approximate. Note that
increasing or decreasing the load by 10% does not affect the total travel.
Under no circumstances should an attempt be made to remove the lock nut and the load adjustment nut from the constant spring hanger.
